Tuesday, August 11, 2015

Nail Polish Catalogue

I have decided that for my own benefit, and for anyone interested, who reads this, to write up a catalogue of all my polishes. This way, when I am out shopping, I can check back here and see if I have the polish or not when buying, rather than buying double-ups... which has happened once or twice or more often, friends giving me polishes for my birthday or Christmas have doubled up by accident, so now, I have a visual log to see what I do and don't have.

This is going to take a while, and maybe a few posts, I don't know.

Today I have photographed all my polishes from The Face Shop (a common and popular beauty store in South Korea where I am currently living), and all my striping polishes too (of which there aren't many yet).

So here goes..

 Wide Nails
Red – RD301
Blue-Purple – PP401
Purple – PP402
Blue –BL602
Green – GR503
Gunmetal – BK901


Gel Touch
Top coat
Base coat
White – WH001
Yellow – YL701
Orange – OR201

Pale Orange – OR202


Pink – PK-101
Pale pink – PK102
Glitter pink – PK103
Red – RD301

Glitter Red – RD303


Purple – PP401
Dark purple PP402
Pale purple – PP403

Glitter purple – PP405


Green –GR501
Lime Green – GR502
Blue – BL601

Glitter Blue – BL605


Tan – BR802
Brown – BR803
Grey – BK901
Black – BK902
Silver Glitter Black – BK903

Glitter Black – BK904


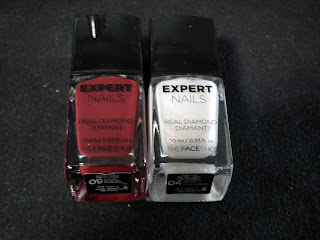
Expert Nails
Red – Scotch Red 09

Ivory – Diaivory 04


Matte
Purple – PP401
Green – GR501

Blue – BL601


Crackles
Black – BK901
Pink – PK101
Blue –BL601
White – WH001
Grey – BK902

Brown – BR801


Cremes
White – WH001
Tan – BR801
Yellow – YL701
Pale orange – OR203
Mid Orange – OR202

Orange – OR201


Red – RD302
Red – RD303
Brown – BR802
Mint – GR506
Blue – BL602

Black – BK901


Neons
Pink 01
Orange 02
Yellow 03

Green 04


Trendy Nails
Green – GLI011
White – GLI003
Purple – GLI004
Coral – GLI012
Orange – GLI009

Pink – GLI010


Metallics
Gold – GL112
Blue-purple – BL602
Blue-green – BL602
Silver – SL211
Blue – BL601

Pink – PK101


Glitters
Hearts – WH003
Purple Opal – PP401
White – WH001
Beige – Crystal Beige
Gold – GL113


Blue-Green-Purple – BL601
Green – GR508
Blue –Blue
Blue-Silver-BL610

Blue-Purple – BL601


Black-purple – BK901
Gunmetal Hologram – BK902
Black-silver-BK904

Black rainbow – BK901


Clear – WH001


Sets
Planet Art Nails – 01 Purple Planet
Gradation Art Nails – 01 Royal Gold
Gradation Art Nails – 02 Steel Navy

Gradation Art Nails – 03 Very Very Red


Check Check nail kit – 01 Pastel Check

Check Check nail kit – 02 Vintage Check


Stripers
Art Deco
Blue Glitter
Silver Glitter
Gold Glitter
Intense Pink
Bright Green

Red Glitter 


Kiss Nail Paint
Black
Silver glitter

White


Artist Dual Nail
01 - Illumilight Pink
02 – Illumilight Silver
03 – Illumilight Gold
04 – Illumilight Purple

05 – Illumilight Khaki

So this is a long post already, I will continue this tomorrow. I've still got Gel polishes, Aritaum, TonyMoly, Innesfree, Avon, and other polishes to photograph and blog. This is 2 of 5 drawers worth of polish, and then I have my stamping plates, and a haul that is on its way to me as well to photograph and catalogue, and figure out where to store all those that are coming too... I forsee more drawers needed soon. Hubby wont like that too much, I think.

Friday, April 24, 2015

How I got into Nail art

So... before I arrived in Korea, I didn't wear any make-up (which hasn't changed), but I didn't wear nail polish much either. I was very much a plain jane.

I must say that I have my sister to thank, a bit, for helping me to get my nails done for my wedding. She set me up an appointment at the salon she was getting her nails done at the time, with a trainee who would use my hands as a model, so she could practice for her exam. This would mean that my nails would be done for free. That was my first experience with having someone else do my nails, and my first experience with arcylics.

While I haven't had acrylics done again since then, I became interested in nail polish and nail art.

A friend of mine, just after I returned to Korea, also began training to be a Nail Tech and began talking to me about her preferences and so forth to do with nail polish and nail art. This got me more intrigued.

I started looking at videos on youtube to get an idea of what nail art was. It interested me a lot. I began watching videos on the bus to and from work every day. My students would all crowd around my seat and watch the videos over my shoulders and ooh and aah at them as well. It made me laugh a bit.

And then it began... my humble 10 bottle collection was about to explode! It went from 10 bottles of polish each 5 years old or older, to 50 bottles in a matter of a couple of months. I found a store nearby that sold pretty colors cheaply, a dollar or so a bottle, and so I started buying many of them.

I began trying some of the more simple nail art tutorials I had watched, and my husband became involved, wanting to try them on my nails too. The more I watched, the more I wanted to try. My students being all girls, began oohing and aahing over my nails too, and became interested in what I was doing.

Within a year of starting my new hobby, I had 100 bottles of polish, and was needing something bigger than the small box I had been keeping my polish in. So I bought a small set of 3 plastic drawers, and immediately filled 1 of them, and then a 2nd one was nearing half full too.

My collection kept growing, and growing and growing. I have now got more than 300 colors and I still continue to get more. I plan to start posting up my polishes in the hopes of a) being able to keep track of them all, and b) in the hopes of inspiring more people to become interested in this too.

If you are interested in getting into nail art, I have 6 youtubers that I would recommend you watch to begin with. They all have amazing designs and ideas, and they share them with the world just because they love to.

The first Youtuber I would like to introduce is the first one I watched... her name is Collette. Her Youtube channel can be found here She has some amazing designs and ideas, she posts hauls and personal opinions/reviews on some of the products she uses. She has some great tips and tricks too. She introduced me to water marbling, which was my first real nail art I tried.

The next Youtuber I would like to introduce is Sandy. Her Youtube channel can be found here. She has some really cute designs, and they are simple to follow. She shows up close, step by step videos of how to do the cutest designs ever. I really love watching her videos. She makes them seem so easy.

The next Youtuber would be Jen. Her Youtube channel can be found here. She has a series called easy nail art for beginners, and she does a lot of polish reviews. She's also got some pretty neat ways of displaying and storing her polish.

The next Youtuber would be Meliney. Her Youtube channel can be found here. She has a lot of ideas and tools that she promotes from her own website while she is doing her tutorials, and her tutorials are super easy to follow too.

The next Youtuber I watched was Hannah. Her Youtube channel can be found here. She has some really cute, simple and easy to do designs on her channel as well, and some stunning manicures that would take me forever and a day to master too.

The next Youtuber I watched, I can't recall her name, but her Youtube channel can be found here. She has some gorgeous, easy manicures too. And she's fun to watch.

I have watched many other youtubers too, but these 6 are the ones I watch on a regular basis, and have easy manicures that are easy to follow and replicate. Once you can replicate the designs these women do, then you are ready to explore the world of nail art more deeply, and find more artists to follow too.

If you have any favorites you like to watch, please, feel free to share them with me. I'm always on the look out for new artists to watch and follow.

Friday, February 6, 2015

Water Marbling

The first nail-art I ever tried was water-marbling.

I had watched MANY youtube videos and this was the one I wanted to try. It looked so interesting.

On the night before a flight to America to visit my in-laws, in a hotel room, my husband and I tried this.

To do water-marbling, you only need a few things...

a paper-cup
something to drag the polish around to make a pattern on the water
clean water
2 or more polishes (that will spread on the water)
Cellotape

First, you need to tape around your nails, so that your skin is covered.
Next, fill your papercup with clean water, to near the top of the cup.
Start dropping your nail polish in drops on the water, building on top of one another, creating a bullseye effect.
Use your dragging tool (a dotting tool/toothpick/orangestick/needle), move the polish around on the surface of the water to make a design.
When you are happy with your design, dip 1-4 fingers into the design, keeping your fingers parallel to the design, and then dropping them into the water.
Use your dragging tool, once more, to remove the excess polish on top of the water, so when you pull your fingers out, your design will not be ruined.
Remove the tape, and repeat for remaining fingers.

Here is the results of my first attempt:


I think my first attempt worked pretty well, don't you?

Neon Stripes on Black

 I was inspired recently by watching yet another youtube tutorial, to try using neon colors on a black background.

I had been wondering what to do with my neon colored polishes ever since my husband had chosen them for me in a random purchase last year. Someone I was watching had used neon colors on a dark background and they looked really good.

I decided that I would try using my neon's to do something fun too.

To do this really EASY but eye-catching design you will need:

1 black polish,
1 white polish
Neon polishes (you choose how many)
A stripper brush/ thin brush/ dotting tool/ toothpick


To achieve the design:

Paint all your nails black.
Using the tool of your choice, make lines on the black with your white polish.
After cleaning your tool, use your neon colors to go over the white polish designs on your nail.
Seal with a top-coat of your choice.


I got a lot of comments from people on this design while I was wearing it. They said it was fun, pretty and bright.

This was a really easy nail-art design to do too.

Honestly, if you don't have brushes or dotting tools, you can do a number of things.
 1) use a tooth-pick or a pencil or a pen that no longer writes, dip it into polish, and let it set, dip again, and let it set, and dip it a 3rd time and use it to do your design.
2) Take a clear nail-polish brush, or a brush from an empty polish bottle, trim off some of the bristles on the brush. Fill the polish bottle (an empty one of course) with some nail polish remover, and then put the trimmed brush back into the bottle. Now you have a stripper brush, and you can use it with any color, and replace it into the remover between colors to clean it.
3) look around your house for something you can repurpose for your needs... a bobby-pin? an old paint-brush? a toothbrush? Anything... use your imagination.


Light Purple Lattice Stamping on Dark Purple tips with Rhinestones

 One of my first attempts at nail-art stamping was to use a Konad stamping plate, and some FaceShop nail-polishes. The brand I used is called "Gel-Touch". This polish is a thick polish that feels like you are wearing Gel nailpolish on your nails, but it's just a simple lacquer.


To do this simple and pretty design, first I used Light Purple Gel Touch, and painted the whole nail.
Next I used Dark Purple Gel Touch on the criss-cross stamp on M64, but I only used half the image. I put that onto the tip of my nails, and then added purple rhinestones, I think these are 3MM sized ones. The whole manicure was finished off with the Gel Touch top-coat. It lasted about 10 days I think.

This manicure was done in 2012, so I don't recall it well.

If you would like to see pictures of the polishes used, and the plate as well, leave a comment below and I'll try and put them up.

KONAD Stamping

So, back in 2011, I started getting interested in Nail art, and I watched many youtube tutorials on the topic.

Many of the videos I saw included something called KONAD stamping. I looked up on gmarket to see if I could find anything to do with KONAD, and found a LOT of stuff.

In March, 2012, my husband asked what I'd like for my birthday, and he looked at what I'd been watching, and he started on a search for some KONAD stuff for me. I'm a very spoiled person, because not only did he find me KONAD products, but he actually bought me Professional Kit 1. Now... for those of you who don't know what that is... have a look at this picture...


In this kit, there is a large stamping plate (with the first 36 plates images on it), up to 10 small round plates (I can't recall how many exactly), a plate tray, 3 scrapers, 3 stampers, 2 top coats, a base coat, a cuticle oil, 19 stamping polish colors, 4 files, some nail glue, rhinestones, rhinestone sticks, glitter, tweezers, a nail-polish remover pump, and a polish tray. It's all inside a briefcase container, and has a sheet of sponges to protect the polish as well.

Now this kit is not overly cheap, although when he bought it, it was cheaper than it is now. If you are interested in getting this kit, you can have a look here, (but beware the ad is in Korean).

I have since built on this kit, and have most of the plates available. I have a small list of plates that are left to buy, but I have seen recently that KONAD have started making different plates too. I am interested in getting all of them, as the designs on the plates are really nice.

I have also tried using BundleMonster and a couple of other offbrand stamping plates, but so far, I like KONAD best.